
Hello my dear Sitecorians
Today I am going to explain about an interesting topic on how we can integrate the XM Cloud Forms with Sitecore Connect using Webhooks
As we know, a Sitecore connect recipe can be triggered using Webhooks. If you are new to Sitecore Connect and you are not aware of how we can use Webhooks to trigger a recipe, you can go through my post and session – https://codeandlearnspot.wordpress.com/2023/11/21/introduction-to-sitecore-connect-bridging-the-gap-between-sitecore-and-rest-of-the-composable-world-part-1/
Lets Begin!!!
After navigating to your XM Cloud application, let us select “Forms”

Once it brings the Forms page, we can “Create a new Form”
The editor looks and feels like XM Cloud Pages – similar styling, layout, and UI elements

First, let’s pick up the layout by simply dragging and dropping it on a canvas. I selected Full Width Layout. Once layout is added, you can start dropping fields to a chosen layout.
For testing purpose, I am adding Name (Text field), Email Address (Email field) and Checkbox for accepting Terms and Conditions.

Note : When you add each fields make sure the name of the field is simple and easily identified. For example, when I added Text field for name, by default the name will be something like “text_66ee8”

Let us change it to something simple and we can identify in the future step. So I changed it to “blog_name”. Similarly Email name is change to “blog_email” and Checkbox field name to “blog_terms”.
Now next is we need to add a Webhook action for the Submit Action. For that Navigate to “Settings” section at the top.

From here you need to Manage webhooks first, where you can create a new Webhook.
Before creating a new webhook, Let us go to Sitecore connect and create a new recipe with trigger action as webhook.
In Sitecore Connect, Create a new Project or use an existing project and Let us create a new “Recipe”.

In the next step, you can select Select “Start Guided Setup” or Setup maually the webhook you need to setup. Here I chose Guided setup
In Guided setup, first you have to give a Event name. When you type the event anme itself, the webhook address would be automatically generated. Let us copy the Webhook address.

When you click on next step, it will ask for a trigger so that the Webhook is setup properly.
Now we need to go back to our Webhook setup in XM Cloud Forms where we stopped. In the Add WebHook, let us add the required details

Once this webhook is created, click on close (at the bottom of the page) and it will take you back to Form Settings page.
In the choose webhook, we select the webhook we just created and click on Test Webhook.

Test Webhook will open the forms in preview mode and you can fill in the details and click Submit.

Submit will open you the window where the submitted parameters are shown and the field names you can verify

Once verified, Submit!!!
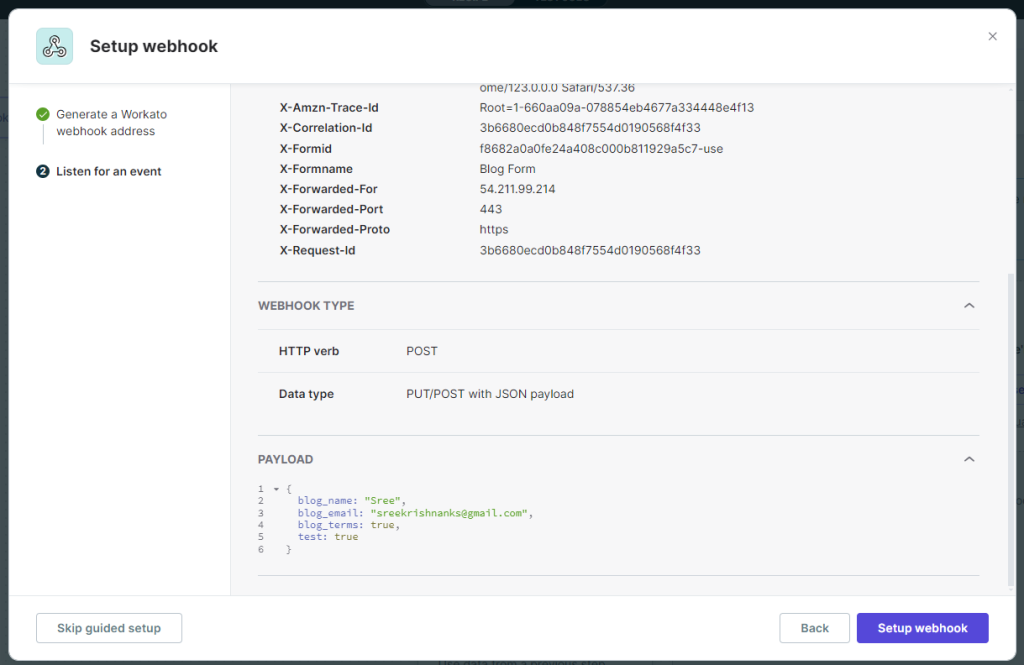
Open the Sitecore Connect page at the same time and you can see the Event has been received

And also the value that you had submitted is also received.
Once validated the data, finish the Setup Webhook.
Now you can use the data for specifying conditions or values to any other Application inside Sitecore Connect. For example, I am specifying a condition if the email is present.

Similarly you can specify different conditions based on Forms data and perform necessary actions in the Connect app.
I hope you found it informative and useful for future if you are using Sitecore Connect and XM Cloud Forms. If you have any further questions, comments, or require clarification on any of the topics discussed, please don’t hesitate to reach out.
Happy Sitecoring !!!
